As you might have noticed, my online activity has practically gone down to zero. There are several things going on in life right now which has caused this slump. The biggest factor is that my folks are here. They have been meaning to visit us every since our son was born but because of the pandemic their plans got delayed. They got here a couple of months ago and life has been – chaotic. In addition, PNW weather this winter has been extra gloomy with rain and clouds predicted even next week. Usually by now the weather is nice and sunny but unfortunately, not this year. These two factors mean that I have to wait for a weekend that is nice and clear and we don’t have anyting planned for me to go flying. Anyway, the bottom line is that my online activity is a reflection of the time I am spending on my hobbies.
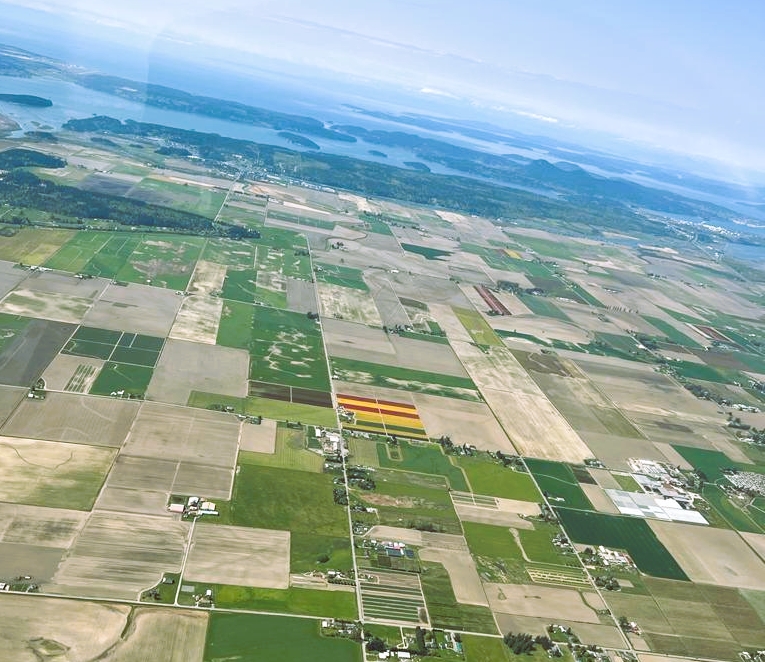
Anyway, in the past few weeks I was able to get one more cross country flight done. This was a flight to Bellingham airport flying over the skagit valley. It is notworthy because its the tulip season. There was mild turbulence along the way but overall it was an uneventful flight. On the way back I did a quick touch and go at Arlington airport before heading back to Paine field. Here is a picture I took on my way up north.
View of tulip fields from the air
This is not my first time viewing the tulips from the air. Although its the first time that I got to take a picture. I think this is the third time that I’ve flown over the tulip fields while the flowers were in full bloom. I remember the first year after I got my private pilot certificate, I was taking my wife to view the flowers but the flight was bumpy. We decided to turn back midway because the conditions weren’t improving and my wife wasn’t comfortable. Anyway, I’m hopeful that I will get to do this soon with my family and slowly expand my mission to go beyond the 100 miles around Everett that I’ve been flying. I think that will happen once I get my instrument rating done. That reminds me… time for more cross countries and time to start prepping for the written exam. Adieu! More later!
It’s been a while since I posted. Pacific Northwest weather has been, well, to put it mildly, bad. For the past two months its been raining or snowing or both. Apparently there is this phenomenon called atomospheric rivers that has been dumping moisture to our area. That has effectively ruled out both my hobbies. I did manage to keep myself current by doing touch and goes on the one-off relatively dry days we saw during this timeframe. There were one or two partly cloudy nights that I could have leveraged to do some astrophotography but given that I have a new mount that I haven’t taken out for a test run, I decided against it. I want enough clear-night time to be able to play around and make sure I understand the working of the mount well, and be okay to have the night not produce useful data. So, the plan is simple, just wait and twiddle thumbs till better weather arrives. I could be doing other things, like updating this blog, which I haven’t done in a while or upload the video I did of trying to re-grease my old mount but I’ve been lazy!! Well, that’s not really true 🙂 . With the holidays and omicron, we did not send our son to day care for the past three weeks and having him home keeps us on our toes all day leaving me with little energy to do anything but watch TV! Prior to that, it was work that was keeping me busy. Anyway, hoping to get caught up on all of that soon.
The purpose of this post, just like last year is to reflect on the past year and list out the things I am thankful for. First off, Happy New Year. This has been another tough year for everyone with the pandemic still very much on everyones mind and a yearning for normalcy that may never come. I will not get into the details of how this past year panned out for me as there were both ups and downs but will just list out the things that I am thankful for.
I’m thankful for my health and my family’s health. I’m thankful for a job where I like my boss and my team. I’m thankful for my wonderfully patient (well, most times) wife. I’m thankful for finally getting permanent residency in the United States. I have been in the US for more than 12 years, I have earned two masters degrees here, have a house, pay my taxes, spend considerable amount of money on my hobbies but yet the system is such that, based on the country you were born in, the wait time to get permanent residency could be up to a few decades if not more. Without green card, there was this cloud of uncertainity hanging over my head where my stay in the US was tied to my employer (same thing for my wife). If anything had happened on that front, we would have had 60 days to find a new job or ship out back to our home country. Permanent residency doesn’t change my life on a day to day basis but just removes that cloud of uncertainity. I’m also thankful that both my brother’s family and my wife’s brothers family were able to visit us during the summer. Finally, thankful that my parents who got COVID despite being fully vaccinated, got only mild symptoms and have subsequently tested negative and have fully recovered.
I was hoping 2021 would have a couple of more things that I could be thankful/happy for but unfortunately they did not materialize 1. my folks or my wife’s folks meeting their grandson, 2. a holiday trip that we had planned to meet my brother but had to canceled last minute due to omicron scare and the weather. I’m hoping in 2022 that will change. Hoping that covid receedes and we can travel and meet/get together with our loved ones more often. On that hopeful note, I’ll sign off!
Here’s wishing everyeone a wonderful and healthy 2022!
I had been meaning to post this for ever. I had, what I thought pretty good arrangement for cable management with my SkyViewPro mount and the ES 102mm. There were only 2 wires going from the mount/telescope down to the battery pack/power supply (technically power supply and router as I was connecting a lan wire to my rasbperry pi). However, with my mount kinda dying and me investing (hehe 🙂 ) in a new one, this setup is not very useful for me anymore. I still thought I should post this for anyone interested in a DIY solution to make cable management easier. I did two iterations of my set up, the second one being much more compact than the first one. Either works. It’s all up to one’s apetite for DIY. I was hoping to do a YouTube video on this as well but never got around to it and now I have dismantled this set up owing to my new mount purchase (details in a later post). This solution may be an overkill for someone who is willing to shell out a few hundered bucks for s device such as ZWO ASI air or ASI Air pro but I like to tinker with things so I built myself a cheap solution. Like I said, I don’t have a video on it so for now pictures and a narrative is all I have. However, I promised a friend of mine that I will build him a similar solution so I’ll plan to record that session and upload it to the interweb.
There are three main components to making cable management easier. All these components need to be placed on the telescope so the smaller the footprint the better it is. My telescope is not that heavy so mounting three different not so compact items did not add too much weight. I used velcro to make sure they stayed on the scope. Anyway, I digress. The components are:
A computer to control the cameras, mount, guidescope, filterwheel, focuser etc. In my case, I used Raspberry pi running astroberry software
A USB hub to run the various devices. Onboard USB ports on Rasbperry Pi are inadequate because of the limite current those devices can draw
A power hub to supply appropriate power to the devices.
12v to 5v stepdown module
Well, its technically 4 components even though I said three main because the stepdown module doesn’t have a very large footprint :). This setup has served me very well and I would have continued using it with refinements over time, if not for a change in my mount that has pretty good features for cable management. The below image is a top view of all the connections. Not sure if you can tell but there is a rasbperry pi on the left and underneath which is a 7port USB3 hub. On the right is a power hub with 12 outs (a typical fuseblock used in automotives). In hindsight, 12 outs might have been an overkill 🙂 . I just needed 6 which ould have still left a couple open for future enhancements (filterwheel) and a couple of dew heaters. In anycase, with the 12 out fuseblock, the weight on the left was being compensated well on the right side so I let it be. While I would, in the future, need an output port for a dew heater, I currently use a cheapo USB one that I had purchased before I built my own DIY dew heater. When I purchased it, I was worried that it wont have enough power output but it works fine for the scope that I have. So I currently use it just for this scope. I dont need to add another output and the 7port USB hub powers it fine.
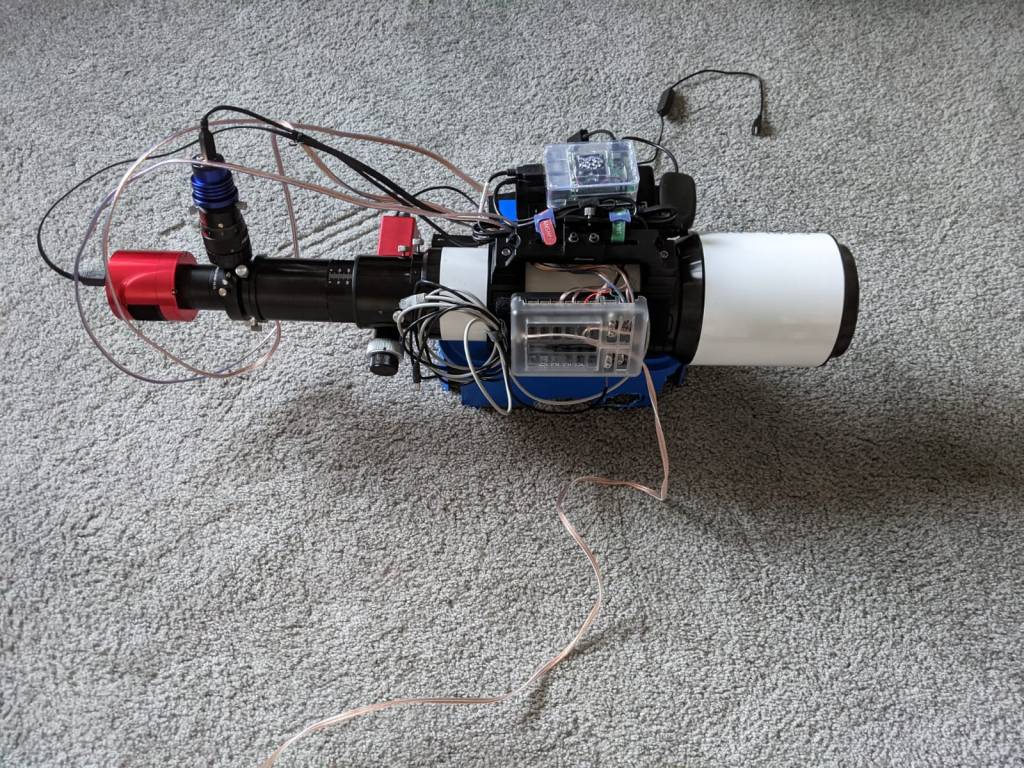
Everything connected to the scope with 2 wires going to the mount and one out to the 12v supply
Here is a view with everything connected and you can see the USB and power for the mount folded near the focuser next to the fuse block. I haven’t used the handcontroller in over a year now. I just use the EQ mod cable with a connection directly from the rasberry pi to the mount. It works great!
All the wires connected
The above set up with Astroberry software works just great except for the focus module. I never seem to have gotten it to work. Others have, so I just need to tinker with it a bit. However, as I think I mentioned in one of my earlier post, I always try to spend as much time imaging on clear nights as possible so have been using a Bahtinov mask. It’s probably time to figure out the focus module to get truly remote set up – from my driveway 🙂 .
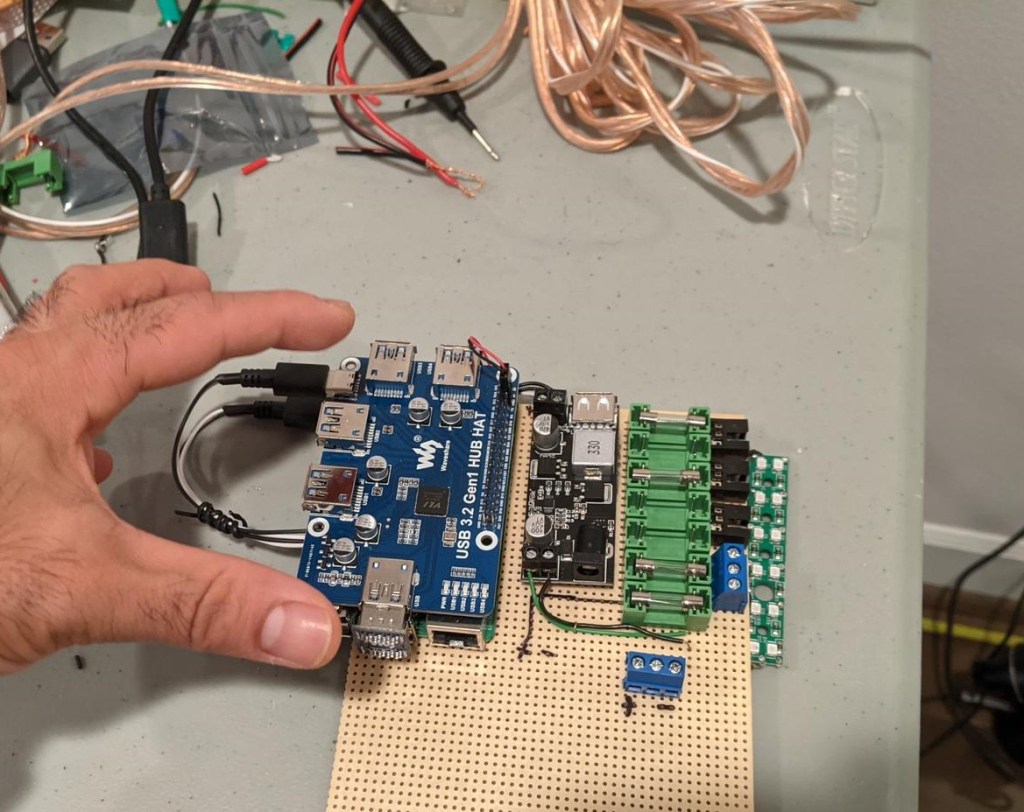
I was in the process of upgrading the above to a very small footprint setup (think ASI air size 🙂 ) but then my mount died and I purchased a new one so that set up is kinda not useful anymore. I am thinking I will leverage that for my friend to use. Here is how the – in progress – setup looks like:
It has 7 power ports and can be enclosed in a small DIY project box once complete. Like I said, I will try to document the process over view and share when done. Till then … Take care!
Early last month, I bid goodbye to my trusty old mount. I had bought that mount about 12 years ago without knowing much about astronomy or astrophotography. All I had was a keen interest and after reading some reviews on Amazon, I went ahead and purchased an Orion 8″ Newtonian and a SkyView Pro (SVP) mount. I For the first 10 years, I used the mount and telescope sparingly for various reasons. As I mentioned in my earlier blogs, starting last year, I have been spending much more time on astrophotography. With a new lighter telescope, I was able to use the existing mount and get pretty good autoguiding for long exposure photography. I had experimented with 10 minute exposures and got pretty nice round stars. I was pretty happy with the combination and would use to look forward to clear nights for setting up my telescope to take pictures. I have dealt with several challenges in my astrophotography journey which I have been documenting in my blog. Those challenges ranged from light pollution to plate solving to focus but hardly ever on auto guiding. All this changed a couple of months ago. No matter how accurate my polar alignment or the balance of my mount, I was not successful in getting autoguiding to work. In fact, over my last few outings, I wasn’t even able to suffcessfuly calibrate the mount to begin autoguiding. In addition, I had noticed that mount wasn’t moving freely when the RA and Dec bolts were disengaged. I did what I usually do.. trusty ole Google 🙂 . After a bit of research I found a couple of posts talking about degreasing the mount for cases where the mount doesn’t move as freely when the RA/DEC locks are disengaged. This usually seeemed to solve the problem for cases when case calibration fails even with accurate polar alignment and well balanced mount.
Given my mount was more than a decade old and was having trouble moving frictionlessly, I decided to put my shoddy DIY skills to use and degrease/regrease the mount. I looked up but did not find any videos on the process of doing that for my specific mount. I’m not someone who backs away from a challenge so I decided I will go ahead without instructions (in reality, my mount was End of Life anyway, so I did not see a huge risk to opening up the mount). I tried to document my journey through a video but not sure how much I captured given that I was so engrossed in oepening up my mount that I did not pay attention to how much was actually captured (and if it was captured well). I tried. I will post my learnings in a new blog post with a YouTube video in case it might help someone. Too lazy to do all the editing needed to get it out there. Anyway, I was able to open up the mount alright – Although there is a big warning for any DIY’ers planning to open up their SVP mount! I almost broke my mount trying to open it up. Orion did some sneaky stuff with the number of screws in RA vs. DEC axes. More on it in the video but suffice to say I almost ruined my mount. Well, the mount was ruined for other reasons that will bcome apparent momentarily but if not for that, i would have ruined a nice mount because of the snafu I made.
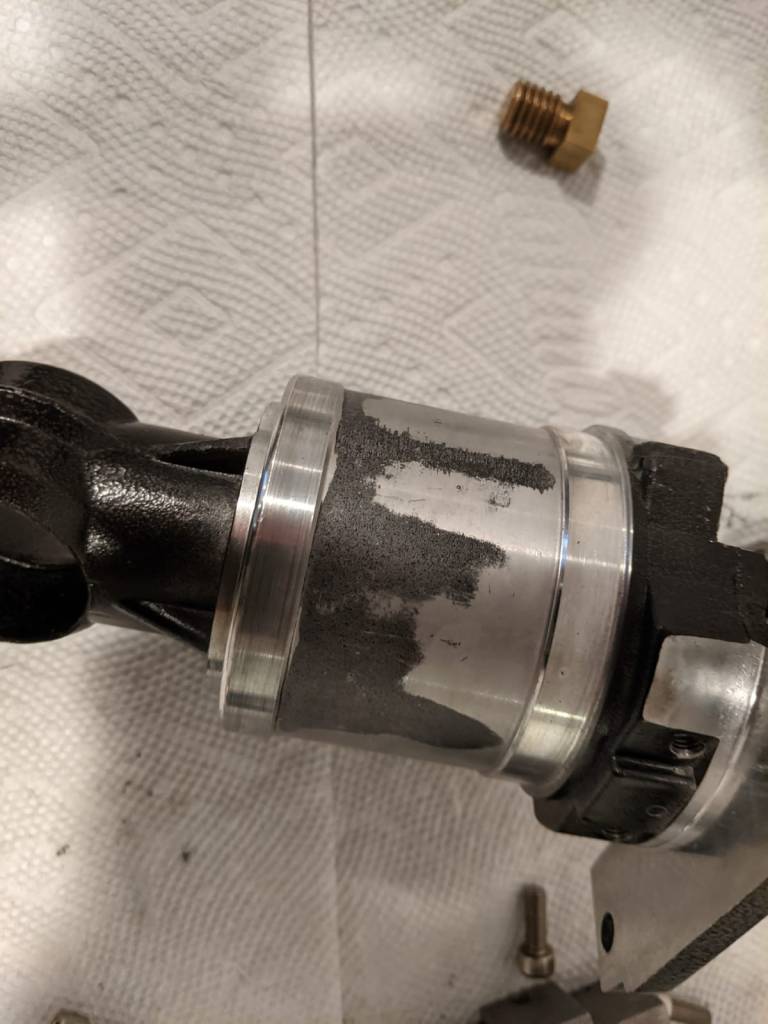
Anyway, the reason I called this blog post end of an era is this:
Major reason why autoguiding on SkyViewPro mount was failing
My trusty old mount had significant abrasions which were causing the friction in the mount preventing it from moving freely! That’s 12 years of wear and tear right there. My handling of the mount was very rough and it had fallen off my hands once. I still had some hope and put a bunch of grease and put the mount together. I tried taking it out on a clear night. I seemed to be tracking well but calibration was failing over and over again 😦 . At that point, I decided that it was time for me to retire this mount (although, I think I can still use it for wide angle unguided photography), and invest in a new one for Deep Sky Imaging. What surprised me was that I was able to take unguided 180 second images which showed very little to no signs of trailing.This is an eight 180 second image stack of fish head nebula (with some basic stretching):
Fish Head Nebula no autoguiding 180 sec*8 images stacked and stretched
Anyway, 180 second is no good if I want to image faint objects with filters applied. More on that in a later post but I did make a decision and invest in filter as opposed to going monochrome with filterwheel etc. It made more sense in light of the investment (well I call it an investment to justify it but its just an expense 🙂 ) I made for a new mount. More on that in another post as well. Hoping to spending more time updating the blog but not many hours in the day to do it… hopefully soon. Until then adios!
As I might have mentioned more than once, my IFR journey is going very very very very slow! I haven’t finished my required cross country time and haven’t been out flying. Life got in the way! With a recent job change and weekends becoming busier with a hyper active toddler, its hard to find 3-4 hours required for me to drive to the airport, get cross country time in and drive back. My thought process has been, if I cant get a clear day and enough time for me to do cross country, I’d rather spend that time at home. However, I can’t get rusty by not flying so I have been doing bare minimum for now. My last cross country was about 2 months ago where I got a $100 burger with the high school buddy of mine.
This past saturday, I broke the almost 2 month long streak of no flying! I needed to get this done because my flight school – Regal Air has a 60 day currency requriement. Meaning you are required to fly with Regal atleast once every 60 days. If not, you need to fly with an instructor before being able to rent. While strict, I think its a good policy to ensure pilot profeciency and safety. So, to add to my cross country time and maintain currency, I decided to go for a flight. Unfortunately, I had booked the plane only for a couple of hours which meant I could do the shortest of cross country flights (to Port Angeles) and that too would be cutting it close if things get delayed. I decided to play it by ear so had not filed a cross country flight plan. Prior to leaving my home, I checked the enroute and destination weather and everything was green. I got to the airport right on time, checked out the plane, did my pre-flight. It was a pretty busy day at the airport given the clear weather. I knew that if I get stuck at the runway for take off clearance, it would add to the time and it would be challenging to come back in time. Given all this, I decided I won’t do a cross country flight but instead head over to Jefferson county airport, do a couple of touch and gos and be back.
It was a nice, calm and clear but hazy day in pacific northwest. The flight to Jefferson county airport is a pretty short one. Aftter getting there, I decided to do a couple of touch and goes. However, on my first approach I thought I was a bit too high and decided to do a go around. In reviewing the video (you can watch it below), I think I could have made the landing but I think my decision to go around was a good one. I don’t want to be in a situation when I am planning for a touch and go and don’t have enough runway ahead of me to take off. My second approach was pretty good, after which I headed back to Paine field. All in all it was a good short flight for me to maintain my currency. Here is a video for anyone interested (43 minute video sped up to 3 minutes 40 seconds):