Skyguider Pro and Autoguiding

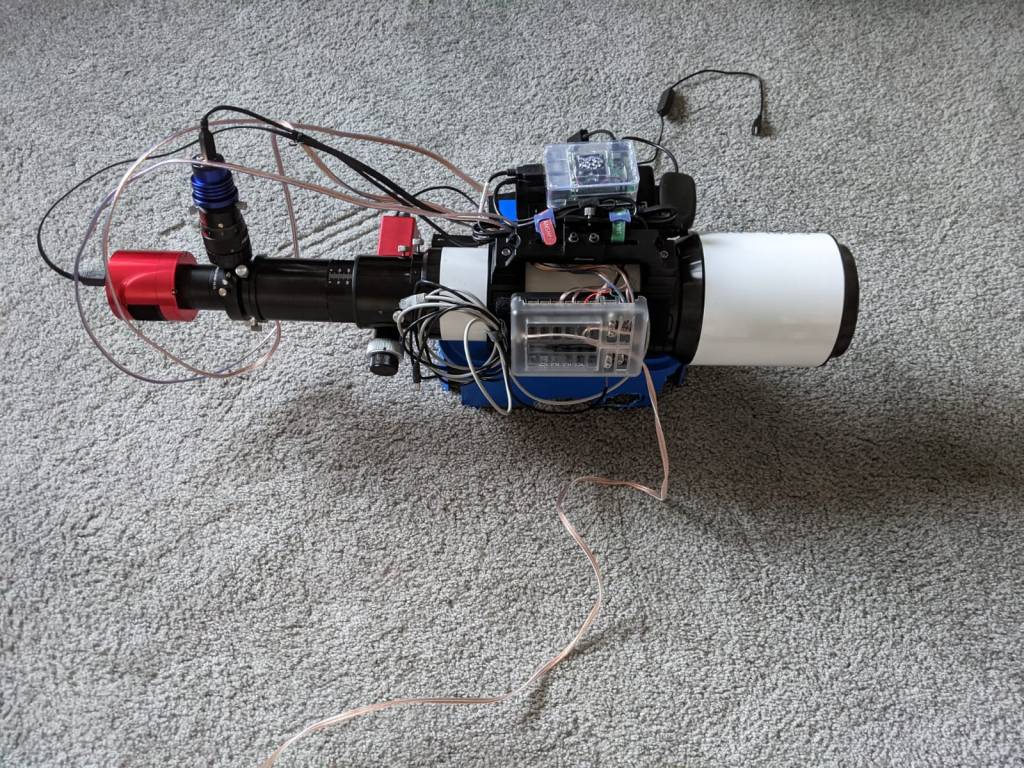
One of the challenges with my astrophotography set up is that its not portable. To be able to take photographs of Deep Sky Objects, I needed a set up that allows for autoguiding while still being portable enough to carry on airplanes. After a little bit of research back in 2022, I found a couple of mounts that I thought would meet my needs. Both were portable tracking mounts (tracking in RA only no DEC motor) that had capability to do autoguiding through ST4 port of the camera. Of the two (Skywatcher star adventurer and iOptron Skyguider Pro), I decided to go with iOptron mount as I had recently purchased another mount of theirs (GEM45) and was pretty satisfied with it. Ofcourse, only a month after I bought the tracking mount Sky Watcher comes out with a portable Star Adventurer GTi which has tracking both in RA and DEC making for better tracking, GoTo capability and pulse guiding through PHD. The mount was announced but was not available to be delivered until a couple of months if I recall correctly. I decided to hold on to the Skyguider Pro and make a decision at a later point if I want to trade-in the Skyguder Pro with Star Adventurer GTi. Only problem is, I never did. We were expecting out second baby so this mount was going to be used when we actually planned to make a trip which was not in the near future. The mount sat in the storage and I just sat on making the trading in decision. Now its too late to get a decent value from a brand new unused mount that is couple of years old when there are much better similar priced optinos in the market available. So I decided I will just use it and not focus on upgrading.

This past month I decided to test out the mount’s autoguiding capability now that my daughter is a year old we have been seriously thinking of starting travel (including camping). I thought testing should be quick and easy but boy was I wrong! We have had a good run of clear night skies in PNW so I set up the mount one night, polar aligned and then tried it with my camera and 70-300mm lens. I hoooked up the autoguider camera (ZWO ASI 120MMS) and guidescope (ZWO 30 f/4) and tried to autoguide with PHD2 with “on camera” as the mount option in the PHD2 setup. During calibration, PHD2 failed saying that there was little to no movement to the east. I tried looking at the cables, connections etc. to make sure if everything was connected right and there were no loose cables. Nope. Everything was connected fine. After fiddling with the equipment for an hour, I decided to give up. Assuming it might have been a faulty cable, I tried to set up the following night again but with different sets of cables. I switched to a ZWO ST4 cable and a different USB from camera to the laptop but no joy. After the second frustrating night, I decided to trouble shoot during the day time and not waste any of the clear nights trying to debug the issue. I used my regular telescope setup to actually gather photons from Deep Sky Objects for the next couple of nights.

To debug, I tried manual guiding by pointing the guide camera to a tiny stationary object during day time but the mount did not budge. With no other ideas on what could be wrong outside of either the wire or the ST4 port on the autogider or mount being broken, I reached out to iOptron for help. After a couple of back and forth emails, I learnt that it could be the ports are wired differently for the camera and the mount. When I looked up the pinouts for the camera and the mount, it was indeed different, although only the RA (left and right) pins were flipped. See below:

Skyguider Pro Guide Port Pinout: Source: https://www.ioptron.com/v/Manuals/3550_SkyGuiderPro_Manual.pdf
Camera Guider Port: Source: https://i.zwoastro.com/zwo-website/manuals/ZWO_ASI_Cameras_Software_Manual_EN(Windows).pdf

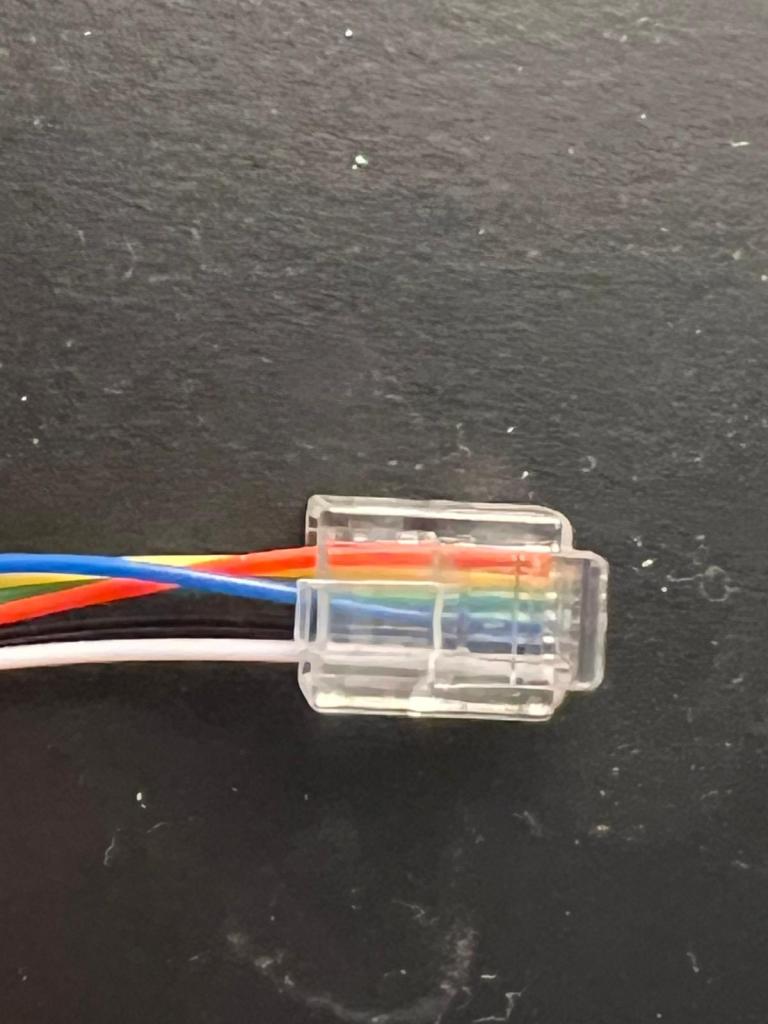
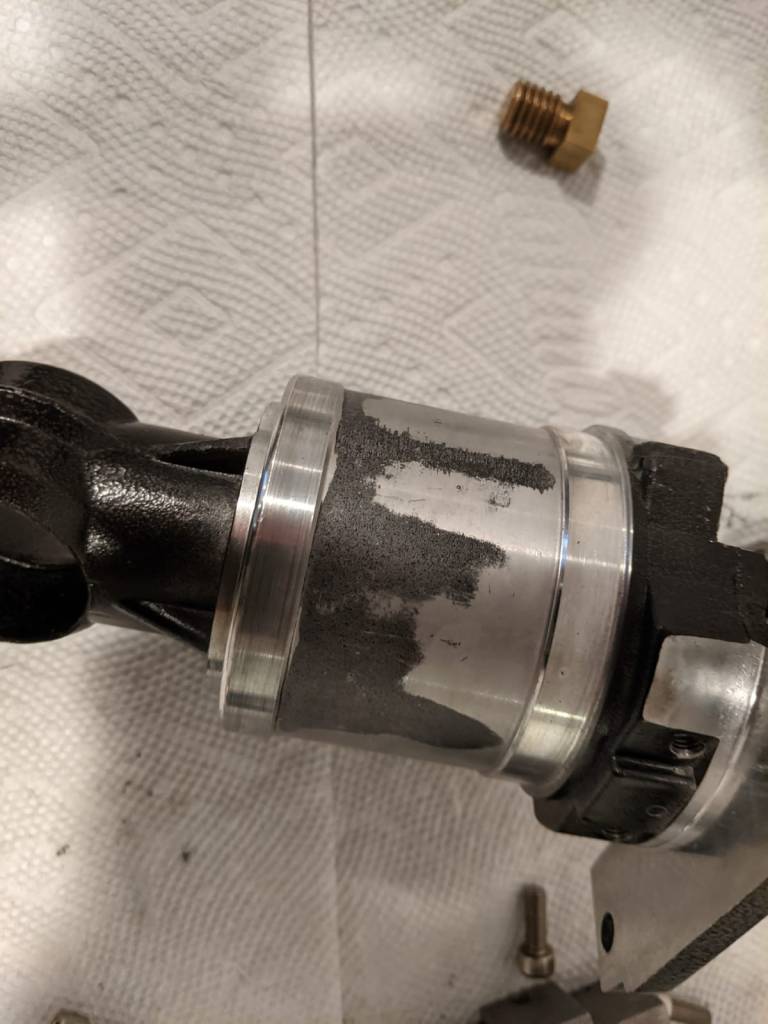
To test if this was the issue, I stripped the RJ11/12 wire flipped the 3rd and 6th and crimped a new RJ11/12 socket. I tested it out using the manual guiding method during the day time and was excited to see the mount move. At night, after the kids went to bed, I set up the mount again and launched autoguiding through PHD2. Calibration succeeded on first try and the mount was being autoguided by the camera. To see if I could get long exposures, I tried several 5 minute subs at 300mm and saw no star trails at all. Exciting times!. I now need to try the 600mm lens and test 5 minute exposures but for all practical purposes my “travel” set up is now ready to go. All we need to do is make some trips to places with lower light pollution to actually use my travel set up to get some DSOs.

Here is the image of the DIY ST4 cable:

Astronomy: Northern Lights

A major bucket list item for my wife and I that got checked off from my list (unfortunately, not my wife’s) was viewing the northern lights. We’ ve always wanted to go to iceland and view the northern lights, hopefully through those glass dome camping sites. However, with work, kids and other things going on in life, we never made plans. It was something we would do eventually. Since we moved to PNW, there were several ocassions when the suns activity resulted in aurora down to our latitudes, however, given the PNW weather all but once, it was clouded out. The one time it wasn’t clouded out, I ventured to a nearby park which was fully packed with people hoping to get a glimpse of the aurora but alas, we didn’t see anything. I took a few pictures that night and did capture some activity but it wasn’t visible to naked eye.

This past month though was a different story. It was a cloudless clear night. I ventured to the same park and took me 10 minutes to find a parking spot at 10pm at night. I found a spot far away from the road to avoid light from cars ruining the image and my night vision and immediately could see a faint wisp of what looked like clouds. I figured it was the aurora and took some pictures. It looked great in the camera. However, as my night vision adjusted and time passed on the activity only increased and i could clearly see the green and pink hues (although not as vivid as the camera captured them).

Everyone, including me, were awed by the brilliant display which at around 11pm at night peaked and exploded to cover almost the entire sky. It seemed to originate at the zenith and spread across the sky (mostly concentrated in East, North and West). The display was very dynamic chaning every few seconds and you could hear the oohs and aaahs from the crowd. It was Amazing! I spent another half hour looking at the sky, taking more pictures and headed back home.

I asked my wife to head out to the park right in front of our home to view the lights as it was clearly visible even with the light pollution around our house. However, she was too tired for the day and decided to try going the following day as the news reported that we should be seeing the activity all through the weekend. The following day she kept tabs on local social media groups to see if the activity was visbile for her to get out and check it out but, unfortunately, it wasnt. Well, all that means is the trip to Iceland is still on our bucket list of things to do. Hopefully, we will have the means and opportunity to go at some point in the future. We hope our kids have an interest as well and can appreciate this amazing celestial event!

Astronomy: Eclipse Chasing

Our first total solar eclipse experience was in Aug 2017, Prior to that, I have always wanted to view one and never got an opportunity. I had viewed a couple of partial solar eclpises but never got a chance to view totality. In 2017, that changed. I had planned a year ahead, booked a hotel and got a chance to view totality after a last minute panic because of marine layer over Newport Beach Oregon. That experience was surreal. It’s hard to explain in words so I won’t even attempt to do that. Needless to say, we planned ahead for the great eclipse of 2024. We traveled to what we thought would be an ideal place to watch the eclipse from – Austin, TX. We stayed at my buddy’s place whose amazing photography skills you can see below. Even though the totality was for a shorter duration here, we figured we could travel an hour away to get into the maximum totality.

We had booked our tickets to Austin more than 8 months in advance . We had planned it to be a week long vacation so that we could spend some time with my friends family and explore Austin as well. However, couple of days before travel, we shortened our trip as our daughter was recovering from a cold so we ended up going there for 4 days as opposed to 7. As we all now know, the weather forecast across texas was really bad and we had resigned to the fact that we may not be able to view the eclipse at all. Also, based on our past experience of 12 hour driving time back to Seattle area after viewing the eclipse in Newport beach, we decided it was not worth it to drive anywhere with two young kids for an eclipse that we may not be able to view because of the weather.

On the night before the eclipse the weather reports were all ominous saying that Ausin would have close to 87% cloud cover at the time of totality. Assuming the worst, we just decided to stay home and check out the eclipse if we were lucky at all. On the day off, it looked like we might not be able to see anything. The sun was behind the clouds most of the day, peeking out once in a while for a moment or two. Since we traveled all the way to Austin from PNW, we decided to go to a nearby park to atleast enjoy the atmosphere of the eclipse if not for the eclipse itself. We headed to a nearby park a little bit beofre totality and waited.

Amazingly, few minutes before totality, the clouds started clearing out and we were treated to a wonderful total solar eclipse! Although there were clouds rolling in an out as you can see in the first picture, it did not take away from the amazing experience.

When people tell me that they saw a 80% or 90% solar eclpise, to stress the magic of totality, I tell them,only half jokingly, that 0% totality is same as 99% totality for a solar eclipse. As you can probably tell, we are enamoured by this phenomenon and we hope to travel, when feasible, to wherever and whenver it occurs! We may be becoming some of those eclipse chasers you hear about in the media 🙂

Diamond ring. Photo courtesy @amanualjolt

Here is another:

Totality in Austin,. TX. Phot courtesy @amanualjolt

Astronomy: Astrophotography Cable Management

I had been meaning to post this for ever. I had, what I thought pretty good arrangement for cable management with my SkyViewPro mount and the ES 102mm. There were only 2 wires going from the mount/telescope down to the battery pack/power supply (technically power supply and router as I was connecting a lan wire to my rasbperry pi). However, with my mount kinda dying and me investing (hehe 🙂 ) in a new one, this setup is not very useful for me anymore. I still thought I should post this for anyone interested in a DIY solution to make cable management easier. I did two iterations of my set up, the second one being much more compact than the first one. Either works. It’s all up to one’s apetite for DIY. I was hoping to do a YouTube video on this as well but never got around to it and now I have dismantled this set up owing to my new mount purchase (details in a later post). This solution may be an overkill for someone who is willing to shell out a few hundered bucks for s device such as ZWO ASI air or ASI Air pro but I like to tinker with things so I built myself a cheap solution. Like I said, I don’t have a video on it so for now pictures and a narrative is all I have. However, I promised a friend of mine that I will build him a similar solution so I’ll plan to record that session and upload it to the interweb.

There are three main components to making cable management easier. All these components need to be placed on the telescope so the smaller the footprint the better it is. My telescope is not that heavy so mounting three different not so compact items did not add too much weight. I used velcro to make sure they stayed on the scope. Anyway, I digress. The components are:

  1. A computer to control the cameras, mount, guidescope, filterwheel, focuser etc. In my case, I used Raspberry pi running astroberry software
  2. A USB hub to run the various devices. Onboard USB ports on Rasbperry Pi are inadequate because of the limite current those devices can draw
  3. A power hub to supply appropriate power to the devices.
  4. 12v to 5v stepdown module

Well, its technically 4 components even though I said three main because the stepdown module doesn’t have a very large footprint :). This setup has served me very well and I would have continued using it with refinements over time, if not for a change in my mount that has pretty good features for cable management. The below image is a top view of all the connections. Not sure if you can tell but there is a rasbperry pi on the left and underneath which is a 7port USB3 hub. On the right is a power hub with 12 outs (a typical fuseblock used in automotives). In hindsight, 12 outs might have been an overkill 🙂 . I just needed 6 which ould have still left a couple open for future enhancements (filterwheel) and a couple of dew heaters. In anycase, with the 12 out fuseblock, the weight on the left was being compensated well on the right side so I let it be. While I would, in the future, need an output port for a dew heater, I currently use a cheapo USB one that I had purchased before I built my own DIY dew heater. When I purchased it, I was worried that it wont have enough power output but it works fine for the scope that I have. So I currently use it just for this scope. I dont need to add another output and the 7port USB hub powers it fine.

Everything connected to the scope with 2 wires going to the mount and one out to the 12v supply

Here is a view with everything connected and you can see the USB and power for the mount folded near the focuser next to the fuse block. I haven’t used the handcontroller in over a year now. I just use the EQ mod cable with a connection directly from the rasberry pi to the mount. It works great!

All the wires connected

The above set up with Astroberry software works just great except for the focus module. I never seem to have gotten it to work. Others have, so I just need to tinker with it a bit. However, as I think I mentioned in one of my earlier post, I always try to spend as much time imaging on clear nights as possible so have been using a Bahtinov mask. It’s probably time to figure out the focus module to get truly remote set up – from my driveway 🙂 .

I was in the process of upgrading the above to a very small footprint setup (think ASI air size 🙂 ) but then my mount died and I purchased a new one so that set up is kinda not useful anymore. I am thinking I will leverage that for my friend to use. Here is how the – in progress – setup looks like:

It has 7 power ports and can be enclosed in a small DIY project box once complete. Like I said, I will try to document the process over view and share when done. Till then … Take care!

Astronomy: End of an era

Early last month, I bid goodbye to my trusty old mount. I had bought that mount about 12 years ago without knowing much about astronomy or astrophotography. All I had was a keen interest and after reading some reviews on Amazon, I went ahead and purchased an Orion 8″ Newtonian and a SkyView Pro (SVP) mount. I For the first 10 years, I used the mount and telescope sparingly for various reasons. As I mentioned in my earlier blogs, starting last year, I have been spending much more time on astrophotography. With a new lighter telescope, I was able to use the existing mount and get pretty good autoguiding for long exposure photography. I had experimented with 10 minute exposures and got pretty nice round stars. I was pretty happy with the combination and would use to look forward to clear nights for setting up my telescope to take pictures. I have dealt with several challenges in my astrophotography journey which I have been documenting in my blog. Those challenges ranged from light pollution to plate solving to focus but hardly ever on auto guiding. All this changed a couple of months ago. No matter how accurate my polar alignment or the balance of my mount, I was not successful in getting autoguiding to work. In fact, over my last few outings, I wasn’t even able to suffcessfuly calibrate the mount to begin autoguiding. In addition, I had noticed that mount wasn’t moving freely when the RA and Dec bolts were disengaged. I did what I usually do.. trusty ole Google 🙂 . After a bit of research I found a couple of posts talking about degreasing the mount for cases where the mount doesn’t move as freely when the RA/DEC locks are disengaged. This usually seeemed to solve the problem for cases when case calibration fails even with accurate polar alignment and well balanced mount.

Given my mount was more than a decade old and was having trouble moving frictionlessly, I decided to put my shoddy DIY skills to use and degrease/regrease the mount. I looked up but did not find any videos on the process of doing that for my specific mount. I’m not someone who backs away from a challenge so I decided I will go ahead without instructions (in reality, my mount was End of Life anyway, so I did not see a huge risk to opening up the mount). I tried to document my journey through a video but not sure how much I captured given that I was so engrossed in oepening up my mount that I did not pay attention to how much was actually captured (and if it was captured well). I tried. I will post my learnings in a new blog post with a YouTube video in case it might help someone. Too lazy to do all the editing needed to get it out there. Anyway, I was able to open up the mount alright – Although there is a big warning for any DIY’ers planning to open up their SVP mount! I almost broke my mount trying to open it up. Orion did some sneaky stuff with the number of screws in RA vs. DEC axes. More on it in the video but suffice to say I almost ruined my mount. Well, the mount was ruined for other reasons that will bcome apparent momentarily but if not for that, i would have ruined a nice mount because of the snafu I made.

Anyway, the reason I called this blog post end of an era is this:

Major reason why autoguiding on SkyViewPro mount was failing

My trusty old mount had significant abrasions which were causing the friction in the mount preventing it from moving freely! That’s 12 years of wear and tear right there. My handling of the mount was very rough and it had fallen off my hands once. I still had some hope and put a bunch of grease and put the mount together. I tried taking it out on a clear night. I seemed to be tracking well but calibration was failing over and over again 😦 . At that point, I decided that it was time for me to retire this mount (although, I think I can still use it for wide angle unguided photography), and invest in a new one for Deep Sky Imaging. What surprised me was that I was able to take unguided 180 second images which showed very little to no signs of trailing.This is an eight 180 second image stack of fish head nebula (with some basic stretching):

Fish Head Nebula no autoguiding 180 sec*8 images stacked and stretched

Anyway, 180 second is no good if I want to image faint objects with filters applied. More on that in a later post but I did make a decision and invest in filter as opposed to going monochrome with filterwheel etc. It made more sense in light of the investment (well I call it an investment to justify it but its just an expense 🙂 ) I made for a new mount. More on that in another post as well. Hoping to spending more time updating the blog but not many hours in the day to do it… hopefully soon. Until then adios!